Showing posts with label creativity. Show all posts

Thursday, August 29, 2019

Quiet relaxing vacation to Gabriola Island, BC

What do locals do on a long weekend in the summer?  Take a short vacation!   We took 4 days and 3 nights to relax and discover Gabriola Island.  It was a last minute trip, so really no advance planning.  We booked AirBnBs and were hoping to visit some artist studios and hang out on the beaches and parks.


picture
One thing about not having a tour guide, and not doing any research is that you might miss a huge attraction and not even know it!  We asked Tourist Info where we should go, and the lady said, Malaspina Galleries Community Park and Drumbeg Provincial Park.  We didn't look at photos of these places, so had no idea what to expect.

real life
Although we went to the end of Descano Bay at the west end of the island where Malaspina Galleries (where the surf like sandstone formation) was, we didn't see it.  It was only after talking to the 2nd BnB owner and seeing photos at the museum, did we know that we missed something big!

The island is quite small, but the town center is at the north end of the island and that's where all the restaurants are.  You will not find food at the south end, and restaurants close early, probably because they're family run.  We were on holiday time and strolling into restaurants at 8pm and they close at 9.  We had to be careful or else we'd be starving for the night!

Sandwell
There are weekend markets on Saturday at Agi Hall and Sunday at Silva Bay and focus on local artisans and growers.  With an island full or artists, they have a yellow flag system.  If there is a yellow flag in the front of their property, it means that the studio is open!  We didn't talk to any artists in their own studios, although we did at the markets.  I guess some were away for the long weekend too.  We did however, get to see 2 self serve artist shops on their property where there were prices on the goods, and a cash box for your money.  It's a good system for a small island like this.

We had a lazy beach day at Sandwell Provincial Park at the north end of the island.  It was quite rocky but we lay down to soak in some sun.

Drumbeg
We moved on to the east end of the island to Drumbeg Provincial Park.  I found this to be a much more scenic park and had lots more places to lay down.

We listened to a live blues band at Skol Pub and probably ate at every restaurant on the island, the Kitchen, Woodfire Pizza, Robert's Grill.

We saw Elder Cedar Nature Reserve.  It was so lush and green in there, it was so relaxing. I felt like I breathed in so much more oxygen.


We tried to access the beach on the south end of the island and ended up at Degnen Bay and marina because we couldn't find any access points. They have yellow stones marked 'public access' if there is a small trail.  We found the Gabriola Passage Viewpoint where all the boats go through.


Another place that was recommended to us was the beaches along the north end of the island.  We settled in at Joyce Lockwood Community Park to do some art and soak in some sun.


Our final stop was Ravenskill Orchard to sample some of Gabbie's award winning cider!  We took some ginger for the road.

I feel so relaxed...

Thursday, December 22, 2011

small successes


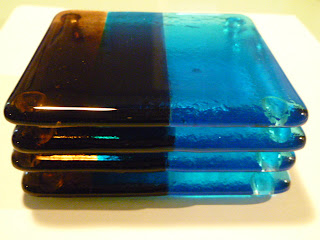
I've been off work for about a month now, and have been focusing on my creative side. I've been to the glass studio many times creating pendants, magnets, coasters and wine bottle trays. It's been quite fun, yet stressful at times. I hate to over promise something that I may not be able to deliver because I am still a beginner. I had a few requests for custom orders and on e 2 occasions, they weren't exactly like I had hoped they would be. Most people call it "art".


What I'm most surprised about is how well the coasters and wine bottles tray are selling, and what great feedback I have. This is most encouraging, to the point where my mind is constantly trying to think of other ways to make use of glass that people would normally recycle. I'm going to keep a logbook, so stay tuned.

Sunday, March 08, 2009

my first glass plates

I went back to the glass studio to make some plates. These are the 4 different styles I chose to try out. 2 are opaque glass, and 2 are clear. They are 8" x 8", slumped. My favourite is the red one, but I got lots of compliments on the green one.

Monday, November 24, 2008

final glass projects


Project # 4 Powder Wafer tile
1st step involves cutting an image out of paper (to make a stencil)
2nd step involves using fine glass powder to fill in the stencil on the shelf in the kiln; cover portions of the tile and use different colours to layer the image, fire - this produces the powder wafer image - very fragile when it comes out of the kiln
3rd step involves putting this wafer on top of 2 pieces of glass, fire
4th step involves finishing the edges and slumping if desired


Project # 5 Totem Pole Bar Pattern Tile
Step 1: cut strips of glass to match each other, can include flat strips and round rods
Step 2: place in the kiln in a pattern with the edges fixes; can line the pieces edge to edge, or angled, or on top of one another, fire - this creates the beginning of your totem pole pattern
Step 3: use a tile saw to cut the tile across the cross section
Step 4: flip 2 strips open faced to get "bookends" which form the totem pole pattern in your finished product
Step 5: add glass borders in a complementary colour and a clear glass base to cover the entire size of the totem pole pattern with border (like a frame); lay the "good side" down (on to the base as this is the presentation side); fire
Step 6: finish the edges, fire polish with the base side up


Project # 6 Double Irid tile

1st step involves picking out 2 pieces of iridescent glass

and placing a piece of resist (plastic) on top of the each irid surfaces

2nd step involves cutting out a design from the 2 pieces of resist on the 2 pieces of glass - spatial competence is required to make a complementary pattern

3rd step involves removing the cut portions from the resist and sandblasting the irid from the surfaces

4th step involves firing with the irid surfaces in between (facing each other)

5th step involves finishing the edges and slumping if desired

Saturday, October 11, 2008

glass project #3


I got my 3D tile back, and I love it! I can see the imperfections of my 1st try, but other than that, I think it turned out pretty good!
It's called kiln carved glass. It's made with 2 firings. The first is the fusing of 2 sheets of glass, ~ 6" each.
The 2nd step is cutting out a design using 2 sheets of fibre paper. The bottom sheet has the oval shapes, and the top sheet has the triangle shapes. The fused glass goes on top of these 2 sheets in the kiln, and as the glass melts, it "falls" through the holes cut out in the design to give a layered tile.

Tuesday, October 07, 2008

glass project #2


I made is this slumped 4.5 inch plate. It is made of melted glass chips called "frit" and coloured with green powder. It was flat after the first firing and I had to smooth out the edges and on the 2nd firing, "slumped" it in a mold (made the glass dip in the middle). I'm sure this is not all the proper terminology, but just what I understand. I found this to be a fun and easy project, but would want the glass to be less thick (it's ~ 2 cm) and more slumped (more dipped). If I can figure it out in time for Xmas, I think it would be a great gift.

Tuesday, September 30, 2008

being artsy


I started taking fused glass classes. It's something I've always wanted to do and I have researched it a little in the past. Classes are few and far in between, and very expensive. I understand that equipment and supplies are expensive, never mind finding an artist who wants to teach the skills. But how come pottery is so affordable?

Our first class was simply a starter. We made 1.5" square designs, which will end up being fridge magnets. They were an experiment. Something like a glass sandwich, with 2 layers of glass and pieces of metal foil in between and on top if you wanted. Due to the fusing process, the foils may change colour to something the teacher hasn't seen before. I'm happy with 3 out of the 8 I made. Guess who gets those?!


I also started making beaded jewelry this past summer. It was a project started because I was Maid of Honor for a friend and had to come up with bridal shower gifts. After that, I went crazy! It seemed that my creativity blossomed late. I spent a lot of years playing volleyball in my spare time, while my girl friends were busy getting domesticated, canning, making jewelry and candles, etc. Well, I finally tapped into my creativity and it's giving me a lot of pleasure. Maybe you'll see one of my designs somewhere...


Tuesday, August 12, 2008

being crafty


Well, if you know me quite well, you'll know that I love community festivals. This weekend we went to Harmony Arts Festival at Ambleside in West Vancouver. It's a craft show and art gallery walk combined with music by the water. It's in its 18th year.
It was pretty cool to see pottery, jewelry, photography and paintings among other artwork. It really brings to mind the fact that art is creative, and being a scientist, it doesn't come naturally to me. Lucky for me, I love to dabble, and so signed up to make my own mosaic tile coaster.

Amongst many kids, I was searching for the perfect design for my 3" x 3" square. I think I went through the saucers of oval marbles, small mirror glass pieces, larger tiles, etc so many times that I could've dug through the inventory several times. I liked the look of the larger tiles but couldn't decide if I wanted a specific colour theme, or just a random assortment. After about 45 min, I decided on random colours, each tile being different and started the gluing process. Since I had never done this before, it was far from perfect and in fact, one tile was thicker than the other, ruining my "flat" coaster for drinks.

Anyhow, it was fun and I felt like a little kid in an adult's body. My boyfriend had a good laugh at my state of panicked creativity. He was supportive, but didn't intrude with his own thoughts of design. So, now I have my own piece of artwork which I will probably use as a candle holder.